Python 爬虫
请求库
request
urllib
selenium
自动化测试工具,驱动浏览器执行特定操作,如点击、下拉等,对于一些javascript渲染的页面非常有效
pip install selenium浏览器驱动
ChromeDriver&GeckeoDriver
selenium是一个自动化测试工具,需要配合浏览器来使用,这里ChromeDriver&GeckeoDriver可以驱动谷歌&火狐浏览器
下载
1.检查浏览器版本
2.选择对应版本的驱动下载
3.将驱动.exe移动到python的scripts目录下
PhantomJS
PhantomJS是一个无界面的、可脚本编程的WebKit浏览器引擎,支持多种Web标准:DOM、CSS、JSON、SVG等
selenium支持PhantomJS,这样运行的时候就不会弹出一个浏览器了
在selenium中使用的话只需要将Chrome换成PhantomJS
from selenium import webdriver

browser=webdriver.PhantomJS()
browser.get('https://www.baidu.com)
print(broser.current_url)
aiohttp
requests库是阻塞式的,必须获得响应才会下一步,aiohttp提供异步web服务,从python3.5 python加入了saunc/await关键字,使回调的写法更加直观和人性化
解析库
lxml
Xpath
常用规则
| 表达式 | 描述 |
|---|---|
| nodename | 选取此节点的所有子节点 |
| / | 从当前节点选区直接子节点 |
| // | 从当前节点选取子孙节点 |
| . | 选取当前节点 |
| .. | 选取当前节点的父节点 |
| @ | 选取属性 |
常用路径表达式
- nodename 选取此节点的所有子节点。
- / 从根节点选取。比如 /bookstore 是选取根元素bookstore, bookstore/book 是选取属于bookstore的子元素的所有book元素。
- // 从匹配选择的当前节点选择文档中的节点,而不考虑它们的位置。 //book 是选取所有book子元素, bookstore//book 选择属于bookstore元素的后代的所有book元素
- . 选取当前节点。
- .. 选取当前节点的父节点。
- @ 选取属性。 //@lang 选取名为lang的所有属性。
- /text() 提取标签下面的文本内容
- //标签名[@属性=“属性值”] 提取包含属性为属性值的标签
谓语用来查找某个特定的节点或者包含某个指定的值的节点。谓语被嵌在方括号中。带有谓语的一些路径表达式:
- /bookstore/book[1] 选取属于 bookstore 子元素的第一个 book 元素。
- /bookstore/book[last()] 选取属于 bookstore 子元素的最后一个 book 元素。
- /bookstore/book[last()-1] 选取属于 bookstore 子元素的倒数第二个 book 元素。
- /bookstore/book[position()<3] 选取最前面的两个属于 bookstore 元素的子元素的 book 元素。
- //title[@lang] 选取所有拥有名为 lang 的属性的 title 元素。
- //title[@lang=‘eng’] 选取所有 title 元素,且这些元素拥有值为 eng 的 lang 属性。
- /bookstore/book[price>35.00] 选取 bookstore 元素的所有 book 元素,且其中的 price 元素的值须大于 35.00。
- /bookstore/book[price>35.00]//title 选取 bookstore 元素中的 book 元素的所有 title 元素,且其中的 price 元素的值须大于 35.00。
选取未知节点
XPath通配符可用来选取未知的XML元素。
- * 匹配任何元素节点。 /bookstore/* 选取 bookstore 元素的所有子元素。 //* 选取文档中的所有元素。
- @* 匹配任何属性节点。 //title[@*] 选取所有带有属性的 title 元素。
- node() 匹配任何类型的节点。
选取若干路径
- //book/title | //book/price 选取 book 元素的所有 title 和 price 元素。
- //title | //price 选取文档中的所有 title 和 price 元素。
- /bookstore/book/title | //price 选取属于 bookstore 元素的 book 元素的所有 title 元素,以及文档中所有的 price 元素。
Xpath运算符
- | 计算两个节点集
- + - * div 分别表示加减乘除
- = 等于, != 不等于, < 小于, <= 小于或等于, > 大于, >= 大于或等于
- or 或, and 与
- mod 计算除法的余数
demo
import requests
import os
from lxml import etree
import logging
logging.captureWarnings(True)

if not os.path.exists('C:\\Users\\HP\\Desktop\\bizhi\\'):
    os.makedirs('C:\\Users\\HP\\Desktop\\bizhi\\')
url='https://xinzhuobu.com/?cat=1&order=hot'
proxies = { "http": None, "https": None}
headers={"user-agent":"Mozilla/5.0 (Windows NT 10.0; Win64; x64) AppleWebKit/537.36 (KHTML, like Gecko) Chrome/97.0.4692.99 Safari/537.36 Edg/97.0.1072.76"}
page=requests.get(url=url,headers=headers,  proxies=proxies,verify=False).text
tree=etree.HTML(page)
img_list=tree.xpath('//div[@class="site"]/div[@class="site-content"]/div[@class="container"]/div[@class="row"]//div[@class="content-area"]//div[@class="row posts-wrapper"]/div[@class="col-lg-1-5 col-6 col-sm-6 col-md-4 col-lg-3"]')
a='1'
for i in img_list:
    img_src=i.xpath('./article/div[@class="entry-media"]/div[@class="placeholder"]//img/@data-src')[0]

    img_name=a+'.jpg'
    a=str(int(a)+1)


    imgg=requests.get(url=img_src,headers=headers ,proxies=proxies,verify=False).content

    img_path="C:\\Users\\HP\\Desktop\\bizhi\\"+img_name
    with open(img_path,'wb')as f:
        f.write(imgg)
        print(img_name,'下载成功')
Beautiful Soup
文档https://beautifulsoup.readthedocs.io/zh-cn/v4.4.0/#
下表列出了主要的解析器,以及它们的优缺点:
| 解析器 | 使用方法 | 优势 | 劣势 |
|---|---|---|---|
| Python标准库 | BeautifulSoup(markup, "html.parser") |
Python的内置标准库执行速度适中文档容错能力强 | Python 2.7.3 or 3.2.2)前 的版本中文档容错能力差 |
| lxml HTML 解析器 | BeautifulSoup(markup, "lxml") |
速度快文档容错能力强 | 需要安装C语言库 |
| lxml XML 解析器 | BeautifulSoup(markup, ["lxml-xml"])``BeautifulSoup(markup, "xml") |
速度快唯一支持XML的解析器 | 需要安装C语言库 |
| html5lib | BeautifulSoup(markup, "html5lib") |
最好的容错性以浏览器的方式解析文档生成HTML5格式的文档 | 速度慢不依赖外部扩展 |
将一段文档传入BeautifulSoup 的构造方法,就能得到一个文档的对象, 可以传入一段字符串或一个文件句柄.
from bs4 import BeautifulSoup

soup = BeautifulSoup(open("index.html"))
soup = BeautifulSoup("<html>data</html>")
对象的种类
Beautiful Soup将复杂HTML文档转换成一个复杂的树形结构,每个节点都是Python对象,所有对象可以归纳为4种: Tag , NavigableString , BeautifulSoup , Comment .
Tag
Tag 对象与XML或HTML原生文档中的tag相同:
tag的属性可以被添加,删除或修改. 再说一次, tag的属性操作方法与字典一样
soup = BeautifulSoup('<b class="boldest">Extremely bold</b>')
tag = soup.b
type(tag)
# <class 'bs4.element.Tag'>
Tag有很多方法和属性,在 遍历文档树 和 搜索文档树 中有详细解释.现在介绍一下tag中最重要的属性: name和attributes
正则表达式
如果传入正则表达式作为参数,Beautiful Soup会通过正则表达式的 match() 来匹配内容.下面例子中找出所有以b开头的标签,这表示和标签都应该被找到:
import re
for tag in soup.find_all(re.compile("^b")):
    print(tag.name)
# body
# b
下面代码找出所有名字中包含”t”的标签:
for tag in soup.find_all(re.compile("t")):
    print(tag.name)
# html
# title
from bs4 import BeautifulSoup
html_doc = """
<html><head><title>The Dormouse's story</title></head>
<body>
<p class="title"><b>The Dormouse's story</b></p>
<p class="story">Once upon a time there were three little sisters; and their names were
<a href="http://example.com/elsie" class="sister" id="link1">Elsie</a>,
<a href="http://example.com/lacie" class="sister" id="link2">Lacie</a> and
<a href="http://example.com/tillie" class="sister" id="link3">Tillie</a>;
and they lived at the bottom of a well.</p>
<p class="story">...</p>
"""
soup = BeautifulSoup(html_doc, 'html.parser')
print(soup.prettify()) #prettify()方法打印出格式化的HTML内容几个简单的浏览结构化数据的方法:
soup.title
# <title>The Dormouse's story</title>

soup.title.name
# u'title'

soup.title.string
# u'The Dormouse's story'

soup.title.parent.name
# u'head'

soup.p
# <p class="title"><b>The Dormouse's story</b></p>

soup.p['class']
# u'title'

soup.a
# <a class="sister" href="http://example.com/elsie" id="link1">Elsie</a>

soup.find_all('a')
# [<a class="sister" href="http://example.com/elsie" id="link1">Elsie</a>,
#  <a class="sister" href="http://example.com/lacie" id="link2">Lacie</a>,
#  <a class="sister" href="http://example.com/tillie" id="link3">Tillie</a>]

soup.find(id="link3")
# <a class="sister" href="http://example.com/tillie" id="link3">Tillie</a>从文档中找到所有标签的链接:
for link in soup.find_all('a'):
    print(link.get('href'))
    # http://example.com/elsie
    # http://example.com/lacie
    # http://example.com/tillie
从文档中获取所有文字内容:
print(soup.get_text())
# The Dormouse's story
#
# The Dormouse's story
#
# Once upon a time there were three little sisters; and their names were
# Elsie,
# Lacie and
# Tillie;
# and they lived at the bottom of a well.
#
# ...
pyquery
tesserocr
存储
数据库
数据库想要和python交互的话需要安装一些python存储库,mysql需要安装PyMySQL,redis需要安装redis-py
pipinstall pymysql redisjson
json跟python中的字典看起来很像,两者之间的区别? 1)json的key只能是字符串,dict的key可以是任何可hash的对象,例如:字符串、数字、元组等;
2)字典是一种==数据结构==,json是一种==数据格式==;字典有很多内置函数,有多种调用方法,而json是数据打包的一种格式,并不像字典具备操作性;
3)json的字符串强制用双引号,dict的字符串可以用单引号、双引号;
一般而言,我们会把json转化为python中的字典或者列表,再对其进行操作。 Pythone3的标准库JSON模块,可以很方便的帮我们进行json数据的转换和处理,这里主要指序列化(json.dumps()、json.dump())和反序列化(json.loads()、json.load())。
常用的JSON模块方法:
-
json.dumps():将Python中的对象转换为JSON中的字符串对象
-
json.dump():将python对象转换成JSON字符串输出到fp流中。
-
json.loads():将JSON中的字符串对象转换为Python中的对象
-
json.load():读取包含json对象的文件。
带s的都是和字符串相关的,不带s的都是和文件相关的。

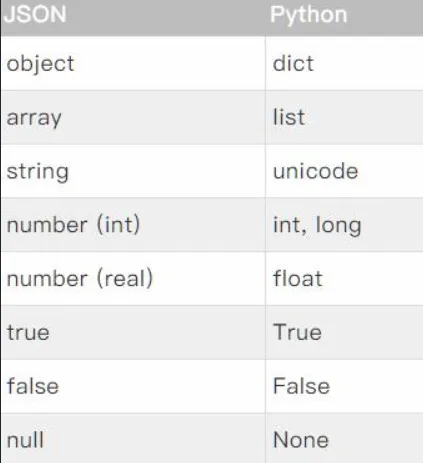
json类型转换到Python的类型对照表

实例
把字典转换成json串
import json
dic = {'name': 'xiaoming', 'age': 29}
json_str = json.dumps(dic)#返回json字符串
print(json_str)
print(type(json_str))
输出:
{"name": "xiaoming", "age": 29}
<class 'str'>
Python解码JSON对象
import json
json_str ='{"id":"09", "name": "Nitin", "department":"Finance"}'
# Convert string to Python dict
dict = json.loads(json_str)
print(dict)
#转换成字典来后,要访问其中的值,可以使用字典的key来访问
print(dict['id'])
输出:
{'id': '09', 'name': 'Nitin', 'department': 'Finance'}
09
读取json文件
import json
with open('test1.json') as f:
    a = json.load(f)
print(a)
print(type(a))
输出:
{'sites': [{'name': '360', 'url': 'www.360.com'}, {'name': 'google', 'url': 'www.google.com'}, {'name': 'baidu', 'url': 'www.baidu.com'}]}
<class 'dict'>
写入json文件
import json
    dic ={
        "name" : "xiaoming",
        "age" : 20,
        "phonenumber" : "15555555555"
    }

    with open("test2.json", "w") as outfile:
        json.dump(dic, outfile)

    文件test.json {"name": "xiaoming", "age": 20, "phonenumber": "15555555555"}
web库
flask是一个轻量级的web服务,这里主要提供API服务
代理
爬虫框架
pyspider
scrapy
requests文件上传
一、文件上传
先将文件读取至内存中,再将内存中的文件信息上传至服务器
单文件上传
①文件上传代码,运行后logo.png文件上传至服务器:
import requests

files = {'file1': open('logo.png', 'rb')}
response = requests.post('http://www.hangge.com/upload.php', files=files)
print(response.text)
②显式地设置文件名,文件类型和请求头:
import requests

files = {'file1':
             ('logo.png',  # 文件名
              open('logo.png', 'rb'),  # 文件流
              'image/png',  # 请求头Content-Type字段对应的值
              {'Expires': '0'})
         }
response = requests.post('http://www.hangge.com/upload.php', files=files)
print(response.text)
多文件上传
有时需要在一个请求中同时发送多个文件,同样使用 files 参数传入一个数组即可:
import requests

files = [
    ('file1', ('1.png', open('logo.png', 'rb'), 'image/png')),
    ('file2', ('2.png', open('logo.png', 'rb'), 'image/png'))
]
response = requests.post('http://www.hangge.com/upload.php', files=files)
print(response.text)
上传文件时需要附带其它参数 如果我们需要在上传文件的同时传递一些其它参数,也是可以的:
import requests

data = {
    "name": "hangge.com",
    "age": 100
}
files = [
    ('file1', ('1.png', open('logo.png', 'rb'), 'image/png')),
    ('file2', ('2.png', open('logo.png', 'rb'), 'image/png'))
]
response = requests.post('http://www.hangge.com/upload.php', data=data, files=files)
print(response.text)
二、流式上传文件
边读取文件边上传文件
1、requests-toolbelt 扩展库 ①有时我们需要上传一个非常大的文件(比如 1G 左右),如果像上面的方式直接使用 Requests 提交,可能会造成内存不足而崩溃。
②所以发送大文件时还是建议将请求做成数据流。不过默认情况下 Requests 不支持流式上传,但有个第三方包 requests-toolbelt 是支持的(本质还是 multipart/form-data 上传)
③ requests-toolbelt 是python请求的实用程序集合。
2、下载安装 requests-toolbelt 第三方库
pip install requests-toolbelt3、使用流式上传文件: 实例:使用 requests-toolbelt 来实现文件的流式上传:
①不同于 requests 全部读到内存中上传, requests-toolbelt 是边读边上传。
②其本质还是 multipart/form-data 方式提交数据,所以服务端代码不需要变化。
import requests
from requests_toolbelt import MultipartEncoder

m = MultipartEncoder(
    fields={'name': 'logo.com',  # 字段1
            "age": '100',  # 字段2
            'file1': ('1.png', open('logo.png', 'rb'), 'image/png'),  # 文件1
            'file2': ('2.png', open('logo.png', 'rb'), 'image/png')  # 文件2
            }
)
r = requests.post('http://www.hangge.com/upload.php', data=m, headers={'Content-Type': m.content_type})
print(r.text)
4、监听上传进度 ① requests-toolbelt 库 还提供了个监视器MultipartEncoderMonitor ,该监视器接受一个回调函数,我们可以在回调中实时跟踪进度。
import requests
from requests_toolbelt import MultipartEncoder, MultipartEncoderMonitor


def my_callback(monitor):
    progress = (monitor.bytes_read / monitor.len) * 100
    print("\r 文件上传进度:%d%%(%d/%d)" % (progress, monitor.bytes_read, monitor.len), end=" ")


e = MultipartEncoder(
    fields={'name': 'logo.com',  # 参数1
            "age": '100',  # 参数2
            'file1': ('1.png', open('logo.png', 'rb'), 'image/png'),  # 文件1
            'file2': ('2.png', open('logo.png', 'rb'), 'image/png')  # 文件2
            }
)

m = MultipartEncoderMonitor(e, my_callback)

r = requests.post('http://www.hangge.com/upload.php', data=m, headers={'Content-Type': m.content_type})